
A Soft, Fluffy Filipino Favorite You’ll Crave Every Morning
If you’ve ever visited the Philippines or grown up in a Filipino household, you’ve likely been greeted in the morning by the warm, comforting aroma of pandesal. These slightly sweet, soft, and pillowy bread rolls are a true staple in Filipino kitchens. Lightly coated in breadcrumbs and best served fresh from the oven, pandesal is traditionally enjoyed with coffee or hot chocolate, sometimes filled with cheese, jam, or even savory meats and spreads.
This easy, beginner-friendly pandesal recipe is perfect for first-time bakers and yields soft rolls that can stay fresh for up to 3 days when stored properly. With just a few basic ingredients and simple steps, you can bring this beloved bread to your table. Let’s get started!
What Is Pandesal?
Pandesal, which translates to “bread of salt,” is the Filipino version of a dinner roll—though it leans more on the sweet side than salty. It’s rolled in breadcrumbs before baking, which gives it its signature texture. It’s versatile, comforting, and incredibly nostalgic for many Filipinos.

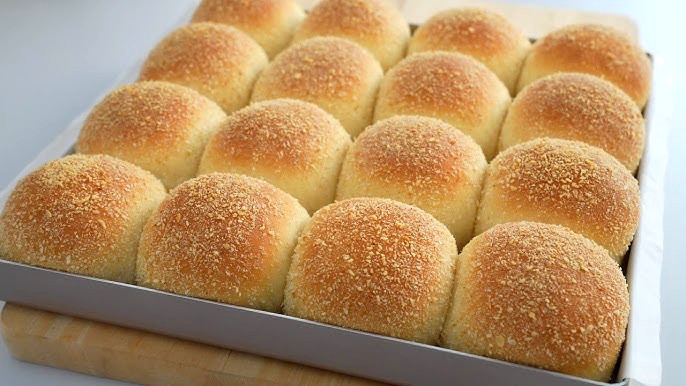
Ingredients (Yields 18 Rolls)
-
1 cup warm milk (250ml) – not hot! Around 100–110°F (38–43°C) is ideal for activating the yeast.
-
¼ cup butter (55g), softened or melted
-
1 large egg
-
2 tsp instant yeast (6g)
-
3¼ cups all-purpose flour (405g)
-
¼ cup granulated sugar (50g)
-
1 tsp salt (5g)
-
2 tbsp neutral oil – for greasing the bowl
-
½ cup breadcrumbs – plain, dry breadcrumbs work best for the coating
Step-by-Step Instructions
1. Activate and Mix the Dough
In a large mixing bowl, combine the warm milk, sugar, yeast, and egg. Stir gently until well blended.
Add the flour and salt to the wet mixture and stir until a shaggy dough forms.
Add the butter and mix again until fully incorporated. The dough may be sticky at this stage—don’t worry.
2. Knead the Dough
Transfer the dough onto a clean, floured surface. Use the slap and fold method or knead by hand for about 7 minutes, or until the dough becomes smooth, soft, and elastic.
Form the dough into a ball.
3. First Rise
Place the dough in a lightly oiled bowl, turning it to coat all sides. Cover with a clean towel or plastic wrap and let it rise for 1 hour, or until doubled in size.
4. Shape the Rolls
Once risen, punch down the dough to release the air. Transfer it to a lightly floured surface.
Divide the dough into 18 equal pieces (you can use a kitchen scale for accuracy).
Roll each piece into a ball, cover, and let them rest (bench rest) for 10 minutes to relax the gluten.
Then take each ball, press gently to release air, and reshape into a ball. Pinch the seams closed and smooth out the surface.
5. Coat in Breadcrumbs
Roll each dough ball in breadcrumbs until fully coated.
Place them in a greased or parchment-lined 9×13-inch baking dish, spaced just slightly apart so they’ll rise and gently touch as they bake.
6. Second Rise
Cover the dish and let the rolls rise again for about 25 minutes. During this time, preheat your oven to 170°C (340°F).
7. Bake
Bake the pandesal in the preheated oven for 18–20 minutes, or until the tops are light golden brown and the rolls feel set.
8. Serve and Enjoy
Let them cool for just a few minutes before serving. Pandesal is best enjoyed warm, especially with a pat of butter, cheese, or your favorite filling.
Storage Tips
-
Room temperature: Store in an airtight container for up to 3 days to keep them soft.
-
To reheat: Wrap in a paper towel and microwave for 10–15 seconds.
-
Freezing: Pandesal freezes well! Wrap individually in plastic wrap and place in a freezer bag. Thaw at room temperature or reheat directly.
Tips & Variations
-
Don’t skip the breadcrumbs! It gives pandesal its classic look and subtle crunch.
-
Sweet tooth? Add a bit more sugar for a sweeter roll.
-
Add-ins: Grated cheese, ube halaya, or even corned beef make delicious stuffed pandesal versions.
Final Thoughts
Pandesal holds a special place in the heart of Filipino cuisine—simple, humble, and deeply comforting. Whether you’re baking it for the first time or recreating a taste of home, this classic recipe will deliver the soft, fluffy rolls that generations have loved.
Serve warm, share with family, and enjoy every bite.